|
Download the
materials
HERE
Place houtnerf 1 in the folder patterns from PSP.
Step 1
Open a new image 600 x 600
pixels.
View - Rulers (when you click here again, the rulers are gone)
Maybe you've never used this before, but you will have rulers on
the upper-and left side now.
Take your selection tool and choose the rectangle. (mode=
replace / feather = 0/ anti alias = checked)
If you look on the bottom of your screen you can see the size of
your image (600 x 600 pixels)
Before that you can see the X and the Y
The X is the vertical ruler and the Y is the Horizontal ruler.
When you play a bit with your cursor in the image, you will see
these numbers change.
Place your cursor on X100 and Y200 and draw a selection.
Just look in the corner below too see the results.
Draw the section till the X is on 450 and the Y is 500.
Don't go nuts when it's a pixel more or less!
Step 2
Change the background color in the
pattern houtnerf 01
Flood fill the selection with this pattern (right click with the
flood fill tool)
Selections - select none.
Now draw a selection from X100 to X150 and go down till just
under your wooden image.
Back to the little hand (pan tool) to deactivate the selection
tool.
Make a copy of the new selection (right click) and paste as new
layer in your image.
Selection - select none.
With the move tool you move the new wooden stroke to the right
side.
Paste it so close to the wooden image that it just look like
you've made the image a bit more width.
Step 3
Select your Deformtool
Now we will start the deformation.
First place your cursor on corner 1 and pull it up with your
left mouse button AND the Shift button.
When you don't use the Shift button the whole stroke will go
upwards and that's not what we want.
Now do the same with corner 2.
After that place the cursor on number 3.
It must be a bit thinner, so push it to the left but DON'T use
the Shift button now.
Deactivate the tool by clicking on the hand again.
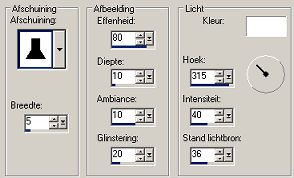
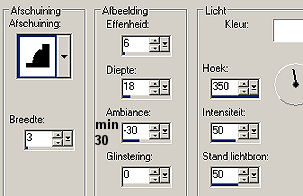
Effects - 3D effects - Inner Bevel
Step 4
Layers - New raster layer
Make a selection from roughly 50 pixels high and a bit wither
than the large wooden plate.
Flood fill with the wooden pattern.
Place the new stroke on top of the large wooden plate.
Select your Deformation tool again and
pull the upper corners to the right (Use Shift!)
Just play a little till the corners fit. Maybe you have to make
it a bit less high.
Probably this will not go right the first time.......just keep
on trying...
And when your finally satisfied:
Effects - 3D effects - Drop shadow (1-1-40-5 color is black)
Selecteer laag 1.
Effects - 3D effects - Inner bevel OK (settings are the same as before)
Layers - merge - merge visible
Step 5
Make yourself a cup of
coffee now, you deserved it ...
Step 6
Make a selection like in this example:

Effects - 3D effects - Outer bevel:
Make a door on the same way and/or
some drawers.
Open the PSP image "Knop"
Change the size when it's to big or to small for your cabinet
and place it on every door or drawer.
Layers - merge visible
Your cabinet is finished now, but
you can put something on top of it.
You can make a foot under it or you can make a mirror on your
cabinet.
How? Oke, I will explain it:
Step 7:
First you move the cabinet to the bottom of your image.
Draw a selection. You can choose a rectangle, rounded or not, or
a circle, ellipse....what ever you want.
Layers - new raster layer.
Selection - Modify - Select Selection Borders (both sides, anti
alias, border width 4)
Flood fill this selection with the wooden pattern.
Effects - 3D effects - Inner bevel (same settings as before or
choose one yourself)
Selection - select none
Layers - new raster layer.
Click in the middle of the mirror with your magic wand tool.
Selection - Modify - expand 2.
Flood fill this selection with the gradient metal steel. (or
gray) Angle 45
Selection - select none
The transparency from this layer in your layer palette between
80 and 90
Layers - arrange - move down.
Now lock the merged layer (by clicking on the eye behind the
layer)
Layers - merge - merge visible. Unlock the other layer now.
After this you will have two layers. One with the cabinet and
one with the mirror.
You can move both of them.
With the Crop tool you can remove the space you don't need....
Well...now it's time to let your own fantasy do the rest of the
work.
Maybe you can save each thing apart
and use it later?
Make sure you save it without a background then.
Lots of pleasures with this
tutorial...
|